nedelja, 1. november 2015

Jupiter - effects PSU - ENG+ SLV

It all started, when Čič came for a visit and I've been boasting with my newly done "sand" effects. And he wanted to try "TT Banana booster" too. So he went to plug the mains adapter to the effect to try it. I saw the mistake at once, but it was too late - he's put the Banana adapter into on of the sand effects, the overdrive. There was a loud pop and distnictive smell of an exploded cap. And surely nothing from the unit anymore. Not only was it the polarity mismatch, there were 14V instead of 9. I knew it was a disaster.
But in the meantime I have learned with the TT Voltage pump failure, that passive parts are not so prone to failure (except the said mispolarization of elko caps) - and there are not much active parts in this circuit; so first I replaced the main cap, which exploded. Then I removed and tested both bigger diodes in the circuit (smaller diodes, which were in the circuit for the purpose of overdrive clipping, werw in such a polace that it looked impossible to be damaged by the failure), but they tested ok, so I soldered them back. The heart of the effect was an opamp, and it was available on eBay, so I oredred the replacement. Put it in - and it worked!
But still, the mechanism of the mistake was bothering me, so I decided to make my own effect PSU with so clearly marked connections to never do such a thing again (?). There were components, which weren't suitable for pure ptp wiring, and I really didn't feel like etching, so I kind of invented my new circuit making way - using rivets, solder lugs and laid wires on a board without copper. And as there is no "signal" wiring, hardly anything would go wrong.

BOM:
- ordinary board for etching, etched all copper off, cut to the size of the chassis
- computer PSU chassis - in the making I experiment with HCl and H3O, to get the "dirt" effect, thus the name of the device
- salvaged central tapped trafo, I think it is 15-0-15VAC, VA unknown, but I have marked it when salvaging to be 30W safe (from the device sticker)
- power common cahtode diode - i like it how simple is it to make a full wave rectification with such diode and central tapped trafo
- 6800uF 63V cap - surely an overkill, but I wanted to be on the safe side + I wanted to try to attach a snap-in cap with my methode - it worked great
- 1uF caps (3x) to paralell the existing elkos - main cap, both exit caps
- two DC/DC buck modules
- LED with corresponding resistor and its socket - when attaching I see it is not a critical thing and solder its ground directly to the chassis
- fan - At first I used it only to cover the hole in the chassis, but then the trafo was getting warm, and it was a nice idea to have the cooling on hand, so I connected it. It is a 24V unit, so it's nicely quiet and slow
- copper net for the chassis openings, fixed with rivets
- fuse bracket and fuse
- wiring - done with ease on the riveted solder lugs


 -------
- zadeva dela - testirano čez noč teklo vse kar imam efektov; morda bi dolgoročno stestiral še pri polni prkilopljenosti z osciloskopom glede vzorca motenj.
- ohišje v "dirt izgledu" - fora s škropljenjem hidroksida z razpršilcem ni dobra, pravi bruniran look dobim le, če s hidroksidom polivam (zadnja obdelana stranica) - ampak še vedno izgleda kul.
- hcl+h2o2 skorajda v trenutku očistita ploščo bakra - je pa že majhna sled lepila dovolj, da baker ostane (morda bi bil to še boljši način za jedkanje plošč od Fe3Cl - ampak jedkanje plošč ni prav aktualno trenutno) - drugačew so te plošče krasne za izdelavo, in po mojem izračunu cenejše od fiberboarda s tt; moral pa bi najti še nadaljnjo alternativo, ki je verjetno še cenejša (1,6 ploščo, ki je neprevodna, nestatična in dovolj trdna)
- clip-on brusilkica za dremelj se res dobro obnese - noro dobro; kako hitro se da delat!
- design z rivets & solderlugs je sicer malce zamuden, ampak izjemno estetski in uporaben. Manjše rivets komajda pridejo skoz plato; za manjše rivets solderlug obrnem naokrog in dam rivet skozi luknjo za žico, žico pa skozi luknjo za rivets- pritrrditev dc/dc modulov s trdimi napajalnimi žicami se odlično obnese
- najprej delam GND povrh in DC spodaj, ampak je logično in bolje, da gre dc po vrhu in GND spodaj (torej ob ohišju) - morda bi za naprej veljalo DC še izolirati (heatshrink)
- vse gre tekoče in brez posebnih problemov
- trafo se greje (kasnejša inštalacija ventilatorja to vse zrihta)
- v noči dam mains na output od modula in ga skurim, jao - nov modul (ampak, saj so poceni); me pa šele ta incidemt opozori, da GND ni potegnjen na ohišje - naredim tako, da je (kot v profi inštalacijah, haha) to storjeno preko pritrdilnega vijaka ploščice) - je pa fajn, ker vidim, da menjava modula poteka hitro in gladko
- voiltažo 9 modula dam njaprej na 9,4V, ampak jo potem dam kar na 9,0, ker verjetno tolerirajo efekti tudi malo premalo (če bi že glih blo)
- ko se odločim dati outpute na stran pri stikalu, je ledica prekratka; najprej jo pustim kar noter, nato pa potegnem do mains inputa - ledice imajo, ker niso kritične v sistemu, vedno lahko gnd kar z ohišja ...
- ventilator - 24V ventilator krasno dela na 12VDC, ravno prav je upočasnjen; noter ga dam, da zapre luknjo v ohišju, ampak potem krasno funkcionira
- uf, kako je fajn pravzaprav delat s central tap trafotom, za full wave ne rabš drucga kot eno common cathode diodo, pa še trafo je ozemljen.
- s solder lugsi se res elegantno in hitro cini, potem ko je reč zvrtana in pritrjena - se obnese! - tudi resoldering je hiter in brez problema
- dober je ta koncept, da je vse na plošči in je tako cinjenja ohišje - notranjsot minimalno
- priotrditev izhodnih kablov s penico je fajn

Skupaj gledano, lepo čist urejen projektr brez komplikacij


sreda, 28. oktober 2015

universal tube preamp PCB - custom PCBs no. 2

When I was looking at different schematics of the tube amps, I noticed there are not much variations in the design, so I thought to myself, why not design a PCB which suits them all. This is the result. I already used two of the boards and they are quite well manageable. Lower portion of the board, made for the tone stack, proved incredibly practical, but requires some planning ahead. There is a mistake with the orientation of the main power cap. It would have been better if the DC and GND rails would be just opposite - DC on top and GND down there - so GND is closer to tone stack and the jacks. The holes for the screws should be closer to the tube socket. Maybe it would be better to make seprate board for around the socket (with  solder lugs - so with a hole and screw places, also for the shield) and separate for the tone stack.

//
write me for the gerber files or made boards

linear PSU - custom made PCBs no. 1

When I started working with electronics, there was a nice little PCB in TT shop, which handled the power supply for the TT pedals, made with 7812 linear regulator. But later I needed more than 1A, which is the limit for that IC, so I started looking around. When working on G5 project, I came across Micrel 29502, a LDO linear regulator with very simple other component requrements, knowing also about 1084 and Lm317 ICs. I wanted to make a simple PCB, which will be useful for all those ICs. Work was much easier, becouse with PSU design there is not so much to worry about the parasitics and similar. Still it was quite a challenge to design it in a way suitable for all different pinouts (roughly speaking, 29502 and 78xx class are compatible, and 317 and 108x are the same) - now the pcb is designed in such a way that first two go on one side, and second two on the other - with all other components of course. The other pin alignment task is made through "the cross" - how to connect is figured out from the application section of the IC datasheet. Both axial and SMD diodes can be used. The design lacks the fixing holes (I counted PCB to be fixed through the IC tab and main cap) - if there is a new version, I am probably including them.

//
write me for the gerber files or made boards

Jackee - TT Peppershredder - SLV


Glede na to, da je proces trajal toliko časa, je dejansko težko zajeti celotno zadevo. V tem času sem se veliko naučil, končni rezultat pa je presenetljivo dober. Zvok je res vrhunski, bruma prajktično ni (v primerjavi z ppsh1 je ogromen napredek). Strošek je bil kar precejšen, je pa res, da sem nabavil še veliko dodatnega materiala (ki mi ga potem zdaj ni treba kupovat).

a) zvok
Zadeva ima soliden overdrive, žal mu pač kot analognemu efektu jaskost z zmanjševanjem gaina/drivea zelo pada; zato je v začetku potem zelo opazen pok Dcja pri preklopu. Glede zvoka drugače dejansko ni pritožb, efekt je solidno tih, tudi pri največjem ojačanju ne daje od sebe nič hrupa, kot da bi bil „tovarniški“

b) uporabnost
Ne vem, kako bo efekt dolgoročno deloval, to bo pokazal čas (verjetno bi znali prit na dan kakšni problematični loti ali poškodovane komponente. Drugače pa je je efekt neuničljiv.

c) izdelava
Proces je trajal res dolgo, verjetno kar ene pol leta, je pa res, da sem zdaj enoto osvojil in posvojil, v procesu sem se veliko naučil. Načrtoval sem zadevo prtecej preveč škrto s prostorom - in tudi preveč natlačeno. Lampama sem dal precej preveč prostora, seveda pa ne morem vedeti, koliko je lahko medsebojnih motenj. A če sklepam po svojem compressorju za bas (kjer je lampa „v srcu“ vezij), to ni tak problem - in bi lahko prihranil ogromno prostora, če bi načrtoval ploščo sredi med lampama. Ali če bi dal lampi zadaj ven (kot sem pač šele zdaj dobil idejo). Velik delež k gužvi prispeva tudi „mode switch“, ki je bil dejansko čisto nepotrebna komplikacija, popolnoma bi zadostoval TS bypass switch. Gneča žičk ob lampah je neznosna! Problem zase je dolžina napeljave - zaradi manj motenj sem jo skušal držati čimkrajšo, a je potem pač tako, da je silno težko bilo delati. Za naprej so verjetno najboljša rešitev konektorji – ali pa „solid“ žica, kjer se izdela vse skupaj in potem vstavi. Ploščici – moji prvi za rabo – sta uspeli kar lepo, edino po izdelavi ju nisem obrusil, kar je verjetno povzročilo slabše prijemanje cina. Tega je bila kriva tudi prenizka temperatura spajkalnika; mora kar imeti 300°C, za odspajkanje in masivne komponente pa raje še več. Zato sem – ker je bil kontakt spajkalnika s komponentami predolg – uničil verjetno kar nekaj komponent in zadeva najprej ni delala. Za naprej velja, da raje malo daljše nogice pustit kot pa cvret komponente. Problem zase je napajalnik TT, ki je usmerjen – in je bila zato napetost na enoti prenizka, morda je bilo celo zato noter „rožljanje“ diod. Za prihodnje je vprašanje, če je sploh še smiselno naročati napajalnike, raje ga naredim sam, po vzoru Moosepotamusovega za Alembic, pa še napetost lahko reguliram (morda bi celo vgradil ločeno regulacijo za heater in pa plato). Pri načrtovanju sem včaish malo pretiraval, kot da bi načrtoval serijsko proizvodnjo oz. imel malo problematičen workflow – v naprej velja pač najprej naročit komponente, potem šele načrtovat notranjost in layout plošče. Če povzamem, pa je izdelava lična in zelo privlačna, sploh bakrene rešetke (še vključi). 


I have included some data from TT page, which is not available anymore (?), so instead of linking I loaded my saved files.


Yabox - former Yamaha guts in new box

I previously wrote about the Yamaha 10W amp I fried, and about trying to fix it. When I asked a friend - electrical engineer- what could go wrong if I have shorted the output, he told me it could be generally 3 thinghs: driver Q, main Q or power resistor (that is also a problem with some other project of mine). In problems at Yahamaha II I learned, that passives can hardly get damaged and that they're actives which fail usualy, so I was brave enough to buy both ICs which are present on the board. As I saw a lot of ceramic caps on the pcb, I also said that I would try and change them to polies, as I had scrapped a lot of them. When plugged in the amp was working. There was an old speaker box in my basement. I made a cut in the back panel and painted it. Then I made chassis for the board from my scrap metal. PCB is pretty narrow, so there was not much need for more than a faceplate - I took an old sign plate (later I found out the material is too thin). I drilled the needed holes (and made some stupid mistakes in process), found and connected power switch and reconnected the AC wiring. I used pcb and speaker from the original Yamaha amp. When connected, the result was quite impressive. Specially distorted sound is fantastic.

When revising my work, I figured out:
- faceplate is too loosely attached, so the air is "leaking" through, making annoying sounds and deteriorating the sound
- the vibrations in the box could break the poweramp IC, which is on the basc part of the chassis
- the device is quite heavy, so the screws for the handle need some help

So I later attached faceplate to the backplate with multiple screws and used some foam tape to seal the faceplate, and made a simple bracket to fix the back chassis, to keep it from vibrating. And drilled a piece of metal to support the handles from the inside.

Rich sand sounds.


simple hacks and workarounds - ALWAYS IN PROGRESS ;)

1) how to atach a LED diode to the chassis? there are many solutions, with its good and bad sides ...
- on many older and cheaper electronics the led light is simply glued in the hole with the thermoplastic glue - the problem is to remove  the led from the hole without destroying it ... another problem is that LED has some volume and if put in thinner faceplate it tends to stick out of it so ugly. For that purpose I use an ordinary nut (for a d5mm LED M6 nut), glued to the faceplate (for the "ordinary" look on the inside, for the more "rock" look on the outside). The threads hold the LED just right in its place, that it doesn't slip out and is pretty easy to remove.

2) pcb rivets - they offer so many advantages in pcb design:
- you can mount components on both sides of the board with ease
- the components are much easier to remove (it is said that it is practically impossible to remove the soldered noval socket from the board without damaging both of them, I did it easily) - this is specially useful for the wires soldered to the board
- the components are soldered on much bigger area, so the joint is better, electrically and physically

The main disadvantage is price, they tend to be really expensive. If I could find a cheaper supllier, I would be very happy ...
Another one is additional work needed - to put the rivets in holes and fix them (I do it with the hammer and a center punch on metal surface)

3) use solid wire to secure jacks and switches having solder lugs to PCB (went great with my custom pcbs)

TT Banana booster


Banana booster is one of the oldest TT DiY projects and it always fascinated me how simple it is. I must have drawn tens of different layouts for it. In preparations for my bigger (half finished) project G5, and waiting for some "sand" kits to arrive I took a cardboard box, an obsolete noval socket and looked for the parts in my drawers. 2 caps and 7 resistors in pretty common values - check! TT LoV PSU from past projects - check (and I had to add two monster caps instead of originals ;)  
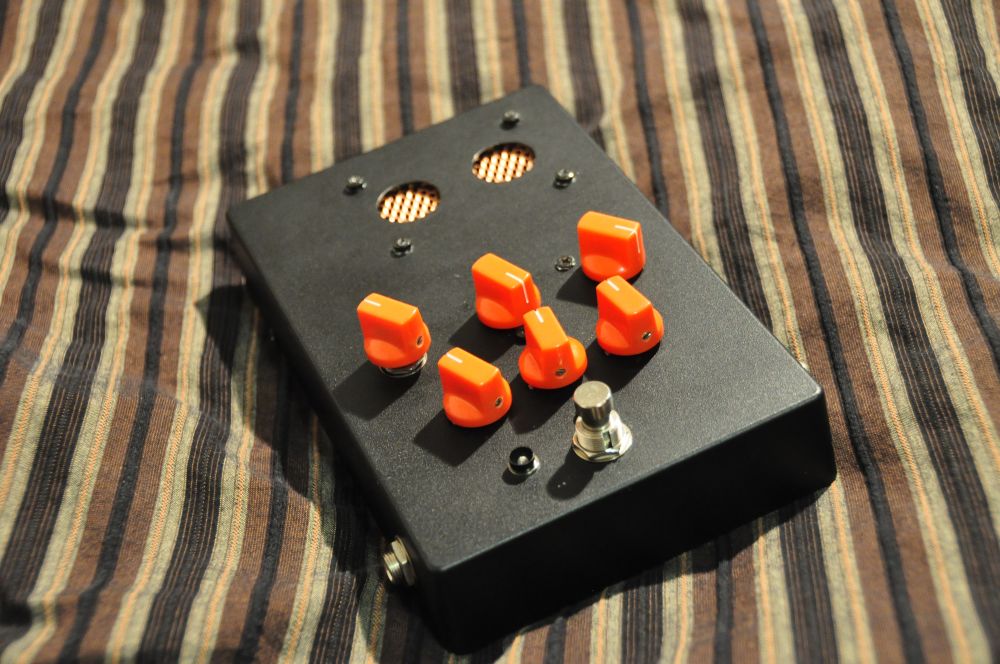
) jacks, knob, led, switch, wires ... Not a thing someone wouldn't have as remains ... Chassis, pot - missing > ordered (can wait). The model in cardboard was made in approx. 2 hours. With direct PTP approach - my way: messy as hell and hard to troubleshoot, also prone to parasitics, but small. When the chassis arrives there is a complication, because the insides are smaller than thought. When plugged in, sound is great, practically no noise. This kind of tube booster on the begining of sound chain is practicaly all the tube in it you need ...
But I am left wandering: what does the "kick" option in the kit add ... A transistor (as in Vanilla)? Later I see it's a switchable cathode cap - and I am kind of dissapointed; also in me, for not getting the idea myself ... I am thinking of putting it in this project, but where ... Maybe.

Design:
- tube socket is mounted with two L brackets - belton noval chassis sockets are made for this mounting (and can prove a difficulty to mount from inside the chassis >> make hole a square OR use nuts as spacers)
- led is an oval sort (3,7x3mm) and so it is mounted noly by frocibly pushing in 3,5 drilled hole - not too cosmetic, but it works
- caps are (again haha) overkill,  this time in the voltage, but I had those home
- DC input terminal is turned to the middle of PCB (so it can be directly at the chassis)
- as the later 14V power adapters from TT are DC, the diodes are replaced with corresponding jumpers
- on the other side of PSU PCB I used an old pin terminal (neither currents nor voltages are too high for that) - and the distance is just right
- oh, and the second overkill: wires - i used the remains of silicon ones from G5 project >> better use solid 0,14mmm, soldering those to the tiny connectors is nuisance
- 1uF cap goes directly from socket to pot
- all ground is wired directly to the input jack; I tested with multimeter, that contact with chassis is made there